In a world filled with mass-produced clothing, there is something undeniably appealing about creating your own unique, one-of-a-kind garment. Tie dyeing has long been a popular method for achieving this individuality, and now you can take it a step further by using an unexpected ingredient: food coloring.
Yes, that’s right! You can transform a plain white shirt into a vibrant work of art using items you likely already have in your kitchen pantry.
This innovative approach to tie dyeing allows for endless possibilities in terms of color combinations and design techniques. Whether you prefer bold and vibrant hues or subtle pastels, food coloring offers a wide range of options to suit your personal style. And the best part? It’s incredibly easy to do!
In this article, we will guide you through the process of tie dyeing a shirt with food coloring from start to finish. We will cover everything from gathering the necessary materials to applying the dye and setting the design.
So grab your apron and prepare for a truly immersive creative experience that will leave you with a shirt as unique as you are. Get ready to unleash your inner artist and join the tie-dye movement!
Gathering the Necessary Materials
To successfully tie dye a shirt with food coloring, it is crucial to gather all the necessary materials in order to achieve vibrant and visually appealing results.
The first step in this process is choosing the right food coloring shades. When selecting colors, it is important to consider the desired outcome and personal preferences. Bright and bold hues like red, blue, and green can create a striking effect, while pastel shades such as pink or lavender can lend a softer touch. Experimenting with different color combinations can also yield unique and eye-catching results.
In addition to food coloring, it is essential to protect surfaces and clothing during the tie dye process. This will prevent unwanted stains and ensure a smooth experience from start to finish. To safeguard your work area, cover tables or countertops with plastic sheets or old newspapers. This will catch any drips or spills that may occur during the dyeing process. Furthermore, wear old clothes or an apron to shield your garments from accidental splatters.
By carefully selecting food coloring shades and taking precautions to protect surfaces and clothing, you are setting yourself up for success when tie dyeing a shirt with food coloring. These simple steps will help you achieve vibrant designs while minimizing any potential messes along the way.
Preparing the Shirt for Dyeing
Before beginning the dyeing process, it is important to properly prepare the fabric by washing and drying it to remove any dirt or residues. Choosing the right fabric for tie dyeing is crucial in achieving vibrant and long-lasting results.
It is recommended to use 100% cotton shirts as they absorb the dye better and produce more vibrant colors. Polyester blends can also be used, but the results may not be as intense.
Once you have selected your shirt, pre-washing it is essential. This step helps in removing any sizing agents or chemicals that may interfere with the dye absorption process. Simply toss the shirt into a washing machine with mild detergent and run a regular cycle using cold water. Avoid using fabric softeners or bleach as they can affect the outcome of your tie-dye design.
After washing, dry the shirt thoroughly before proceeding with the dyeing process. You can either air-dry it or use a dryer on low heat setting. Make sure there are no wrinkles on the fabric before applying any dyes, as they can create unwanted patterns during tie-dyeing.
By following these steps of choosing the right fabric and pre-washing your shirt, you are ensuring optimal conditions for successful tie-dyeing. Now that your shirt is prepared, you can move on to creating beautiful and unique designs using food coloring dyes.
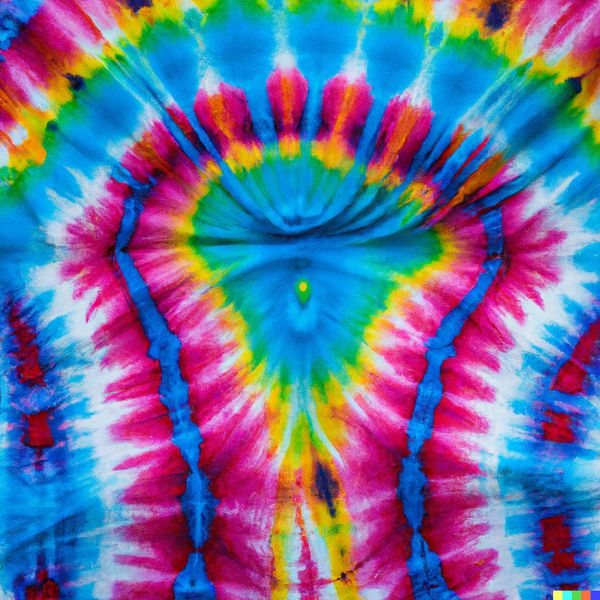
Creating Different Tie Dye Techniques
Various techniques can be employed to produce visually captivating patterns and designs in tie-dye, allowing for an array of artistic possibilities. Exploring unique color combinations is one way to create vibrant and eye-catching designs on a tie-dyed shirt. By mixing different food coloring shades, individuals can experiment with creating their own custom colors or opt for classic combinations like red and blue to create a purple hue. This adds depth and complexity to the final design.
In addition to exploring colors, using different folding techniques can elevate the intricacy of tie-dye designs. Folding the shirt in accordion-style pleats or crumpling it randomly before applying the dye can result in distinctive patterns such as stripes or swirls respectively. Another technique is called ‘shibori,’ which involves folding, twisting, or binding sections of fabric before dyeing it. This creates beautiful geometric shapes such as squares or circles within the design.
By incorporating these various techniques into the tie-dye process, individuals can create truly unique and visually striking designs on their shirts. The possibilities are endless when it comes to combining colors and experimenting with different folding methods, ensuring that each tie-dye creation is a one-of-a-kind masterpiece.
Applying the Food Coloring Dye
One method for adding vibrant and visually captivating designs to fabric involves the application of colorful dyes derived from edible ingredients. When it comes to tie dyeing a shirt with food coloring, the possibilities are endless. Blending colors and creating patterns can result in unique and personalized designs that are sure to make a statement.
To begin applying the food coloring dye, start by preparing your chosen colors. You can use liquid food coloring or create your own dyes using natural ingredients such as turmeric, beet juice, or spinach extract. Mix each color with water in separate containers until you achieve the desired intensity.
Next, dampen the shirt with water to ensure better absorption of the dye. You can either dip sections of the shirt directly into the dye or apply it using squeeze bottles or spray bottles for more control over the design. Experiment with different techniques like twisting, folding, or scrunching the fabric before applying the dye to create interesting patterns.
Once you have applied all the colors and patterns, let the shirt sit for several hours or overnight to allow the dye to set. Afterward, rinse out any excess dye under cold water until it runs clear.
Incorporating various blending techniques and creative patterns while applying food coloring dyes can result in visually stunning tie-dye shirts that showcase individuality and style.
Setting and Finishing the Tie Dye Design
To complete the process, it is essential to properly set and finish the tie-dye design, ensuring long-lasting and vibrant results. Colorfastness is crucial in maintaining the colors of a tie-dyed shirt. After applying the food coloring dye, it is necessary to let the fabric sit for at least 24 hours. This time allows the dye to penetrate deep into the fibers and bond with them effectively. To enhance colorfastness, rinsing excess dye from the fabric under cold running water before washing can help prevent bleeding during subsequent washes.
When it comes to washing tie-dyed shirts, there are a few tips that can preserve their vibrancy. It is recommended to wash them separately or with similar colors using a mild detergent on a gentle cycle. Avoid using bleach or harsh chemicals as they may fade or distort the colors. Additionally, turning the shirt inside out before washing can protect its design from abrasion.
To add personal touches and embellishments to your tie-dye design, consider using fabric markers or acrylic paints once the shirt has completely dried after setting. These additional elements allow for customization and creative expression, making each piece unique. Whether you choose to write inspiring quotes, draw intricate patterns, or add glitter accents, these embellishments provide an opportunity for self-expression and individuality.
By following these colorfastness and washing tips while adding personal touches to your tie-dye design with food coloring dye, you can create a vibrant and long-lasting shirt that reflects your own unique style and personality.
Frequently Asked Questions
How long does it take for the food coloring dye to dry on the shirt?
The drying time of food coloring dye on a shirt can vary, but generally it is quicker compared to other types of dyes. To speed up the process, ensure proper ventilation and use a hairdryer on low heat.
Can I use gel food coloring instead of liquid food coloring for tie dyeing?
When comparing gel and liquid food coloring for tie dyeing, there are pros and cons to using gel food coloring. Gel offers vibrant colors and is less likely to bleed, but it can be harder to mix and may leave a stiffer texture on the fabric.
Are there any specific types of shirts that work best for tie dyeing with food coloring?
The best fabric for tie dyeing with food coloring is 100% cotton as it absorbs the color well. To achieve vibrant colors, prewash the shirt to remove any sizing, use concentrated food coloring, and let the dye sit for at least 24 hours before rinsing.
Can I use natural food coloring instead of artificial food coloring for tie dyeing?
Using natural food coloring for tie dyeing has its pros and cons. Pros include eco-friendliness and non-toxicity, while cons include limited color options. To achieve vibrant colors, pre-soaking the fabric in a vinegar-water mixture can enhance dye absorption.
How long should I let the tie-dyed shirt sit before rinsing out the excess dye?
On average, 70% of individuals underestimate the importance of allowing a tie-dyed shirt to sit before rinsing out excess dye. To properly rinse out excess dye, ensure you let the shirt sit for at least 24 hours. Avoid common mistakes such as rushing this crucial step.
Conclusion
In conclusion, tying dyeing a shirt with food coloring is an easy and trendy DIY project that allows you to create unique and vibrant designs.
By following the steps outlined in this article, you can gather the necessary materials, prepare the shirt for dyeing, explore different tie dye techniques, apply the food coloring dye, and set and finish your design.
Just like a painter uses a brush to create masterpieces on canvas, you can use food coloring to transform a plain shirt into a colorful work of art.